Friday, January 31, 2014
Damask Divas Blog Hop: Ivy Lane
Welcome Ladies to another super fabulous Damask Divas' Blog Hop! If you came from Sharon's Blog, you are in the right place. If you have jumped here and just discovered our blog hop, feel free to check the list at Damask Divas Blog to find the complete list of blog hop participants.
This month we are highlighting the New paper pack: Ivy Lane. I love the beautiful prints in this pack and it was hard to decide how best to show them. I actually have been working on some Valentine cards to present to my Church for an activity this month and when I finally had this paper pack in my hands, I found I was drawn to the shades of pink, with hints of green in it.
I needed something simple, but elegant for this card and I think I managed to do just that. I made two different cards, as the first one I wasn't quite as pleased with how it turned out. Both cards have a 2 inch strip of Ivy Lane floral B&T paper, I then decided to use some Pear cardstock on both cards to hold the theme & thought of the card.
The first card I used a bit of Blush on the first card, as another flash of color and a point to top with a bit of lacy ribbon. I also adorned the Title with a bit more of the lace. I loved how all the colors worked together, but I decided I wasn't fond of some of the layout. Which brought about my work on card number 2.
On the second card, I wanted to keep with the same theme with some differences. I added some Blush cardstock on the second card to emphasize the color scheme and help highlight the Title, which I did in Blush. I rounded corners to give a gentler touch and topped it off with a bit of lace. I really liked the addition of the lace, because it gave a more romantic look. I used the I Adore You stamp set for the phrase, as well as the heart on the second card. I used Hollyhock done in a second generation stamp to enhance the background. (Second generation means you've ink the stamp, then stamp it once on another paper and then finally stamping it on your project.) I added an additional bit of pop with two small hearts cut from Artbooking cartridge, the second of the two was given a 3D element using our 3D Foam Tape.
I had a lot of fun putting together these cards, trying to create a beautiful card to share and teach with the ladies at Church. I hope this inspires you to pick up your own materials and create beautiful Valentine's cards this year! Head over to my website and order today!
I hope you've enjoyed our Blog Hop thus far, your next stop is Stephanie's Blog! Don't forget to Get Crafty!
Monday, January 27, 2014
Washi Wonderland
These days who doesn't enjoy simple projects that look great? I know I definitely have days where simple is better! With the creation of Washi Tape, there has definitely begun a crazy especially in the crafty world, because there is so much you can do with it. From simple embellishments to more elaborate uses, the sky is the limit! Check out this fabulous video sharing a new way to use Washi Tape and your Cricut!
Sunday, January 26, 2014
Love You More...
To get myself feeling the romance and the fun of Valentine's Day, I've been trying to put together some fun and romantic cards. I even put together a scrapbook layout based on one created by Becky Higgins, of Project Life fame. I've had one custom order already and I was given a lot of leeway on the design. The only direction I was given was that she wanted it to say something about love, since it was for her husband. I've been making biweekly visits to Archivers, since its going out of business and I've been snagging scrapbooking & crafting supplies that I cannot purchase from Close To My Heart at incredible deals.
I managed to pick up a ton of super cute Valentine cardstock! I'm loving some of these patterns! I so I whipped together this super cute, slightly fancy and totally easy card! The card base was 5x7 in Daisy White cardstock, then I used the front and back of a sheet of my newly acquired cardstock to create the bottom of the front. I love how the front was all these layers of ribbon like patterns and the back was grey with white polka dots. The combination on front was so fabulous! Then I cut the cute rectangle card from another newly acquired sheet of cardstock, making sure to cut it precise and round the corners. I liked the cute 'Love You More,' phrase! Then I gave it some 3D effect by placing some 3D foam tape underneath and then added this totally great section of crocheted ribbon over the top of the bottom section. I love the look, it was cute and classy. Plus, like I said totally simple. I added a cute little poem on the inside to finish it off and it was ready to go to its new home.
I'm hoping to put together some fun cards for my kids to give out over the next couple weeks. So, I should be sharing those soon. Now what I learned from making this card was that it can look elegant without being overly complicated. Don't let using an embellishment that you've never used before intimidate you. You'll never learn if you don't try! So, go out there and make this year's Valentine cards yourself! Don't forget to Get Crafty!
Monday, January 13, 2014
Clearly the Best: Crafts for your Curls
Looking for some fun ideas with curls? What a great project to work on with your daughters or sisters or girl friends! So cute!!!
Sunday, January 12, 2014
Project A Day: Do You Want To Build A Snowman?
Have you seen the movie Frozen? If you haven't you are absolutely missing out on the cutest movie ever! I think it is by far my most favorite cartoon yet! My favorite character is this little guy.....
Honestly, who doesn't love this sweet and yet so totally naive snowman? If you haven't gone to see it, you should and take your family with you! We took all four of our kids ranging from 5 1/2 to 21 months to see it on Christmas Eve as a fun surprise for the kids. They all sat transfixed for pretty much the entire movie. They did get a little wiggly the last 15 mins or so, but that's pretty impressive.
For Day 8 of the Project A Day Challenge with Mandy Leahy, the theme was Winter and I actually orginaly planned to do a winter layout, which I do have started, but since I was feeling under the weather most of the weekend, my plan to catch up was put on hold. I did manage to gather a bit of energy this evening. I put together this simple, but super cute card based on the aforementioned Frozen!
I used some of the ever cute Frosted paper and then from there I went pretty basic: Daisy White, Black, Chocolate and Autumn Terracotta cardstock! I was pleasantly surprised that our white cardstock worked well enough to trace the picture of Olaf. (Unfortunately, I'm not that good of an artist) I also traced the cute sentiment. I love how this turned out. However I might try to do something different with his arms next time, but oh well, I still think it was a big success!
Want to make your own and use high quality products, go to my website and order your own supplies!
I'm also entering this into Craftin Desert Diva's Linky Party, whose current theme is Winter. Such a fun way to share projects and bring in new fans! Want to share your projects head over and enter your's today!
Friday, January 10, 2014
Project A Day Days 5-7
Once again I'm kind of mushing together the days since I'm behind on this. In retrospect at least I'm participating, even if I'm behind just a bit. So be prepared for three awesome days worth of cards!
Day 5 was Washi Tape, which I haven't actually purchased any washi tape yet, so the closest I could get was to use my super cute Washi Wonder stamp set, which is a Hostess stamp set in the Close To My Heart Autumn/Winter Idea Book. (You can still snag this stamp set this month if you Host an Online Party or a Home Party this month, contact me if you're interested!) Since I'm new to washi tape, I was actually at a loss of what to do with it. I did make a cute card for Christmas with the same stamp set, but I felt I needed to try something new. Now I wasn't as excited by how this card turned out, but you know what I learned something while I did it.
I love how much fun I had trying to figure out how to accommodate each day's theme and for the most part I've loved how everything turned out! If you want to pick up some of these supplies to make your own cute cards and scrapbook layouts, check out my website and snag some of this great stuff before its too late!
Day 5 was Washi Tape, which I haven't actually purchased any washi tape yet, so the closest I could get was to use my super cute Washi Wonder stamp set, which is a Hostess stamp set in the Close To My Heart Autumn/Winter Idea Book. (You can still snag this stamp set this month if you Host an Online Party or a Home Party this month, contact me if you're interested!) Since I'm new to washi tape, I was actually at a loss of what to do with it. I did make a cute card for Christmas with the same stamp set, but I felt I needed to try something new. Now I wasn't as excited by how this card turned out, but you know what I learned something while I did it.
I felt it lacked something. I couldn't tell you what, but I didn't allow myself to dwell on it. I moved on and tried a new card for the next day. So I made a less then great card, but I'm still learning. Never let the fact that one card or project turned out less then you wanted, get you down. You are constantly learning new things and you can move on to something better!
Day 6 was Polka Dots and I actually had fun doing this one. I kept it simple, used a bit of blue polka dotted paper I had around and then I tried out my super cute Angel Friends stamp set, for the angel and a sweet message inside. I also tested out my new chalk set that I picked up the other day.
I love the simplicity of this and it was super easy to do!
Day 7 was Banners and at this point I was working the Midnight oil. I needed to keep it simple and sweet! So I used paper from the Chantilly paper pack (which is retired) to make my banners, as well as a bit of Twilight cardstock. I cut the super cute pink patterned paper about 3"x3" and dovetailing it.
Then I cut the Twilight piece just a bit shorter and skinner, followed by the beautiful blue & yellow patterned piece. I layered them together, added a touch of bling and finished with a cute 'Hello' sentiment using my You Are My Happy Alphabet stamps (a stamp set out out specifically for National Stamping Month back in September) in Twilight ink.I love how much fun I had trying to figure out how to accommodate each day's theme and for the most part I've loved how everything turned out! If you want to pick up some of these supplies to make your own cute cards and scrapbook layouts, check out my website and snag some of this great stuff before its too late!
Wednesday, January 8, 2014
Project A Day Challenge: Days 2-4
I'm kind of behind on the Project A Day Challenge, but I'm working to catch up. So, sorry this post is going to be a whirlwind of project fun and excitement! I'll keep it simple, if you'd like to know more about each project, just let me know and I can do a more detailed post!
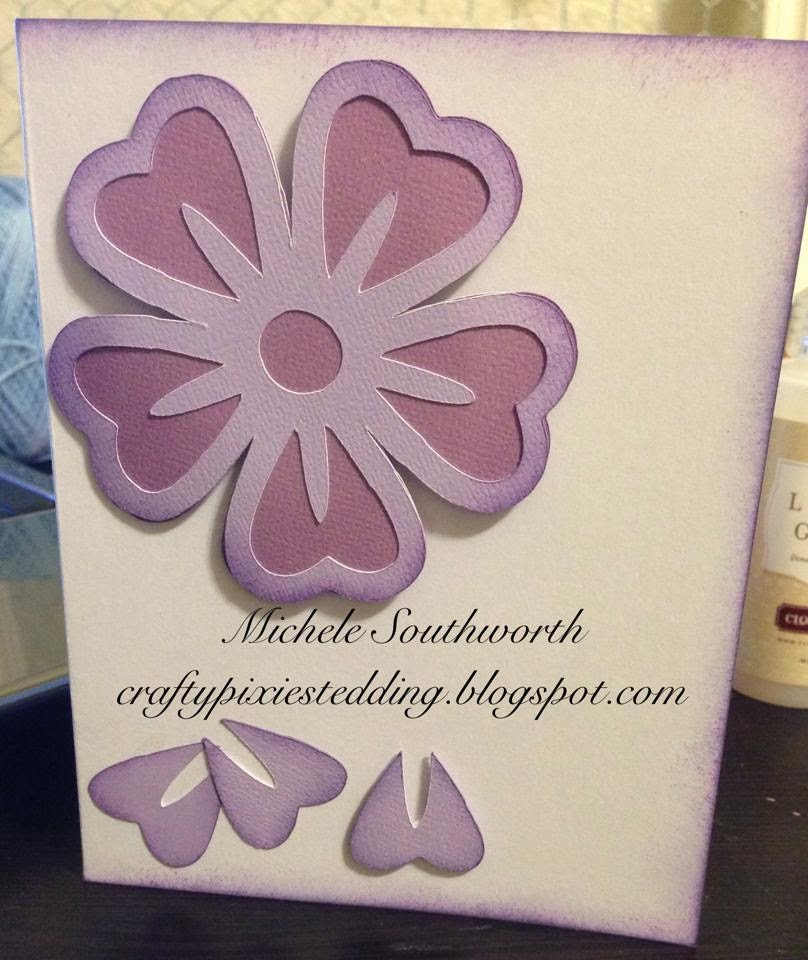
I created this card for Day 2, which was have a flower on it. So I cut this cute flower out with two different shades of purple cardstock and layered them together. I also inked the edges with a sponge to give it some texture and I love the edging look. I also did that to the edges of the card base and to each of the cut outs, that I used as petals. I used an older & retired stamp set from Close To My heart for the inside sentiments and I cut the flower from the Artbooking Cartridge. (A must have!)
Day 3 was use scraps to create a project, I actually had fun creating this card. I used scraps of paper, of which I have a ton, rounded the edges and sponged brown ink on the edges to create a well worn book spine. Then I wrote the names of some classic authors and then stamped a welcome bubble. Such a fun and simple card, that used only scraps to do!
Day 4 was Home Decor. This was a lot harder for me, since I'm more practiced in scrapbook layouts and cards. I looked around at what I could alter for my home and came across this hideous pink cork board that I believe belonged to my Mom at one point. So, I pulled out the remains of the For Always paper pack, a sheet of Twilight cardstock, three extra flowers from Day 2's project and finally I used the remnants of pink paper to cut out my name. I used liquid glass to make sure the paper would stick, added my embellishments making sure to add a little pop and bling. I was actually quite pleased with how this impromptu project turned out. Now I just need to add some hooks to the back and hang up on my office wall!I hope you guys are getting some great ideas from this super fun challenge. I hope its getting you out there testing new ideas and just plain having fun! Send your love to Mandy and share your projects over on her Facebook page: Close To My Heart (CTMH) Scrapbooking & Stamping with Mandy Leahy
Thursday, January 2, 2014
Project A Day Challenge: 3-D Project
I'm participating in this really fun and super exciting Project A Day Challenge with Mandy Leahy! What a fabulous way to start out the New Year! She gives you a theme, a color, a shape or even an idea to work with each day for the Month of January! Head over to her blog and join in all the fun!
For my fun 3-D project, I decorated a bag for a birthday gift. I had fun putting this together, because it was something different for me. I usually stick to cards and scrapbook layouts, because they are so much simpler. I really enjoyed trying to figure out how to give this bag some pop, sparkle and flair. I attempted to do a 3-D rose from the Close To My Heart Art Philosophy Cricut Cartridge, but I think that's something I need to work some more on! Lol, it did NOT turn out how I wanted it to and so I had to do something different, but that turned out great. Now go on, Get Crafty and join in the fun!Supplies I Used:
*Art Philosophy Cartridge
*Twilight Cardstock
*Chantilly paper pack (while supplies last)
*Clear Sparkles
*3-D Tape
A Christmas Card Using Leftovers
Looking for a super classy and simple Christmas card? To make this cute reindeer card all I did was use the base portion of an image I cut out for another project. Cut it to the size I wanted, as well as the base would allow. I cut a piece of Juniper cardstock to match the size of the image and glued them together. Place them on a card base. Added a cute phrase inside, tied a bit of bakers twine to the side and here I had a simple, holiday card.
This super simple idea can be used for birthdays or really for any kind of card you want. I think it gave the card a simple, but very chic look. It took me about 20 mins to whip together and I loved how it look. Honestly I can't get over how much I love this card. I will definitely be making more like it next year!
Supplies I Used:
*Candyland stamp set
*Cricut Cartridge
*Juniper cardstock
*Ruby Ink
*Bakers Twine
Pick up your supplies today! HERE
Wednesday, January 1, 2014
Christmas Tags
How many of you spend a decent bit of money every year to make sure you have Christmas tags for all your gifts for the holiday season? I know I do or use to anyway. This year since I now have a fabulous excuse to continually buy Scrapbooking supplies galore, I had the supplies handy to create my own tags. Now don't let it discourage you that I'm posting this after the Christmas Gift Rush, because these simple tags can be made for any theme or holiday!
I picked the colors/themes of paper that went well for Christmas, so lots of greens, reds and I have even fallen for blues for Christmas this year! I did the same for my inks and went to town! I used my CTMH Art Philosophy Cricut Cartridge to cut the tags in the variety of tag shapes. I made sure to do some with the cutout images and some the same size without the cutouts. Then I matched up the two tags and glued the together! So simple and they look so nice!
I also made sure to not throw away any of the cutout image pieces because they can be used to add to a plain tag to give it dimension! Like this tag here; I used a Juniper cardstock to cut out the tag in, then I used Slate cardstock to cut out the tags with the ornament cutouts. Then I took the ornaments, cut the straight pieces to be in three different lengths and glued the longest two on the card. The shortest I saved for last and used a piece of 3-D Tape to make it a dimensional element on the tag.
The next step is to stamp or write your favorite sentiment in a corresponding color. Its one of the many reasons I love Close To My Heart stamps, because they come in so many options, particularly where the holidays are concerned. The last thing I did after stamping the sentiments is to tie some baker's twine or thread or ribbon to the top. There you have a cute and simple tag.
I made all these tags for a couple Christmas Boutiques I participated in this year. I love how they turned out, unfortunately I wasn't really in the right areas or time frame for them to sell well. I also made these mini card tags. They were also very simple to do, just make card bases in about a 3"x3" size and make your images fit in that space. Then it gives you the option to use it like a card or punch a hole in the upper corner and tie it to a gift!
Supplies I used:
*Art Philosophy Cricut Cartridge
*Sparkle & Shine paper pack
*Juniper Cardstock
*Twilight Cardstock
*Slate Cardstock
*Juniper Ink
*Ruby Ink
*Olive Ink
*Ponderosa Pine Ink
*Chocolate Ink
*Cranberry Ink
*Bakers Twine
*3-D Tape
*Tree Delights stamp
*Hostess Rewards: Washi stamp set
*Frosted Cardmaking Workshop stamp set
*Various other papers
Want to purchase supplies to make your own cards and tags? Head HERE to order Close To My Heart Products on my website! I hope this gives you some great ideas for gift tags or other fun projects! Don't forget to Get Crafty!
Subscribe to:
Posts (Atom)